

HubSpot Server-Side Tracking: Complete Setup Guide (2026)
HubSpot’s browser-based tracking loses leads to ad blockers, cookie limits, and privacy settings, especially the ones you paid to acquire. Server-side tracking with sGTM and Custom Behavioral Events sends form fills, meeting bookings, and chat conversions directly from your server to HubSpot’s API, so every lead reaches your CRM and feeds accurate lead scoring, workflows, and attribution. At Tagassists, we’ve built HubSpot server-side pipelines for clients across SaaS, agencies, and B2B lead-gen, paired with Meta CAPI, Google Ads, and GA4 for full-funnel accuracy. Tell us about your setup and we’ll show you what’s leaking.
Last Update: September 24, 2026
HubSpot is one of the favorite tools for marketers because of its built-in tracking code, which works through the browser, using JavaScript and cookies to collect visitor activity. But did you know this can cover basic website tracking, while browser-based tracking can have limitations when cookies are blocked, browsers restrict tracking, or users have privacy settings enabled?
Isn’t this where the leads are slipping through your notice, and you keep thinking, “Why is the big ad spend not working?”
This is where server-side tracking can help. With server-side Google Tag Manager (sGTM), you can send selected data to HubSpot from the server instead of relying entirely on the browser. For more advanced tracking, you can also use custom behavioral events to capture actions that matter to your business.
Good to be here. Today, we will show you the combined custom behavioral events with sGTM server-side tracking setup for a more flexible way to send meaningful event data to HubSpot. Let’s help you build a tracking setup that is more controlled and reliable.
If tracking or analytics is not your background, Tagassists can help. We work on paid ads tracking setups for Meta, WordPress, and other platforms. Proper tracking setup can either make or ruin your business, but our professional help can help you scale with optimized ad spending.
What is HubSpot Server-Side Tracking?
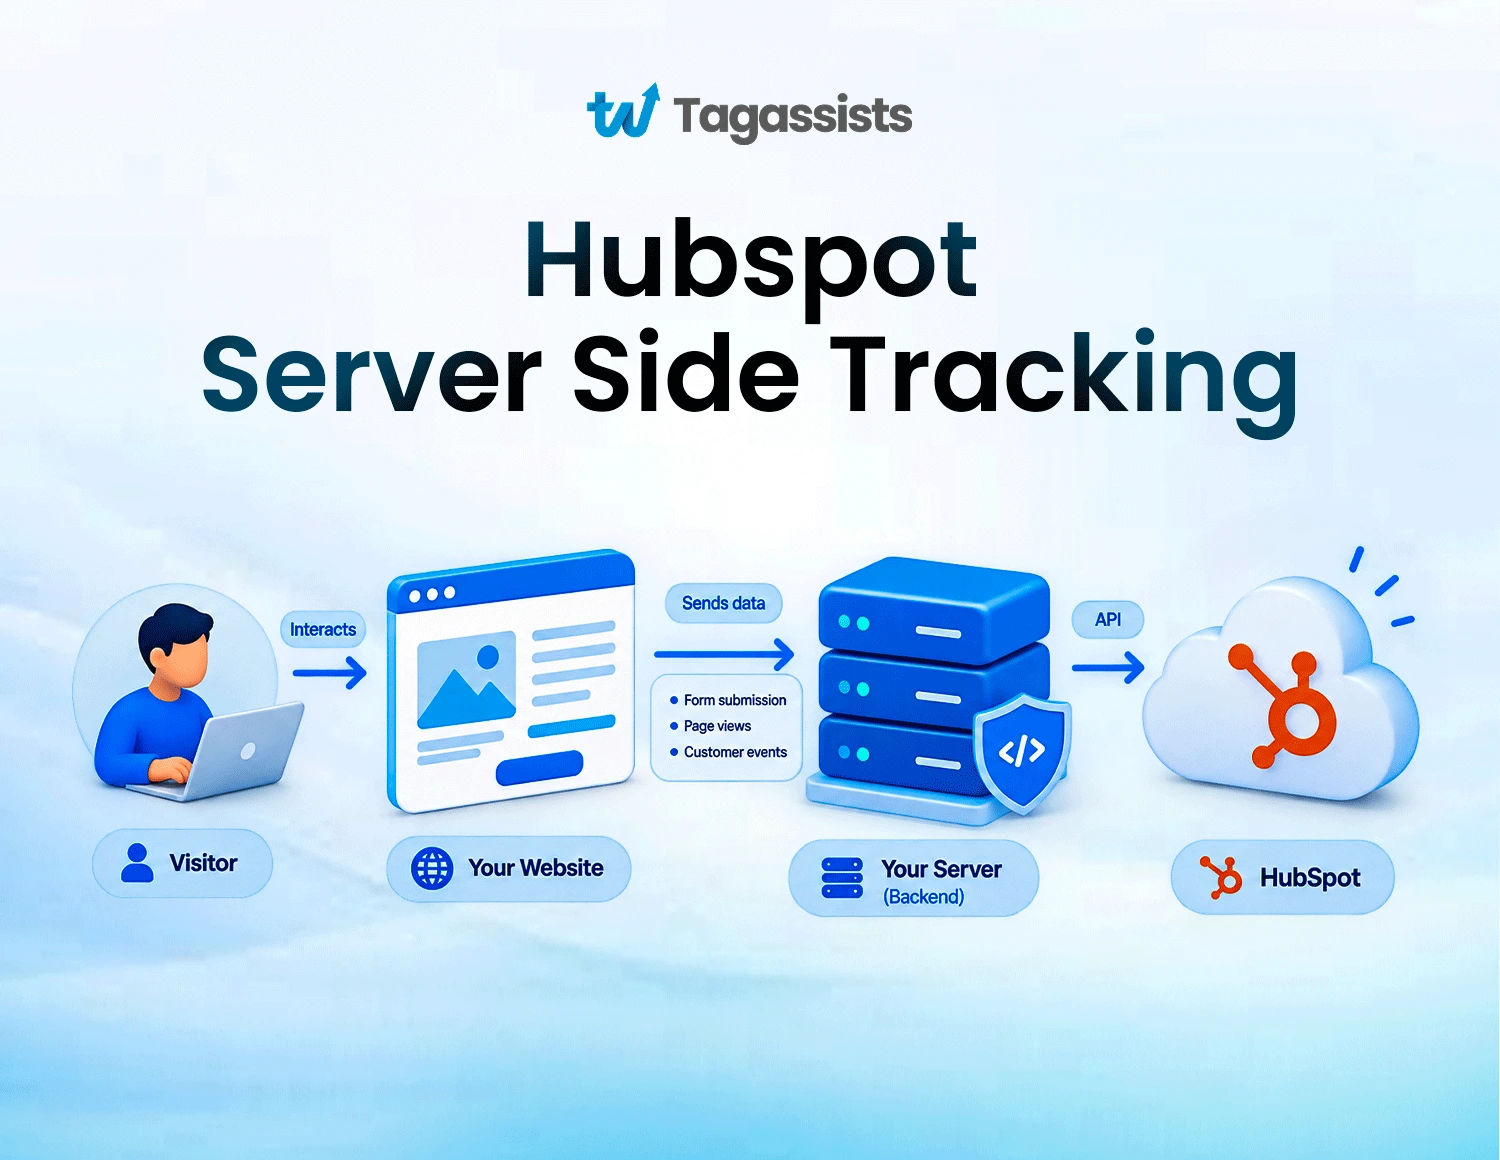
HubSpot server-side tracking sends user data and custom behavioral events directly from your web server or a server container (like Google Tag Manager Server Container) to HubSpot’s APIs, bypassing the user’s browser because cookies can be blocked, as many people use ad blockers.
The concept is similar to other server-side tracking methods, like Meta server-side tracking, Microsoft server-side tracking, WordPress, and so on. We have covered detailed tracking setups in simple steps, which you can check.
However, standard HubSpot tracking scripts and forms run in the browser using JavaScript. Server-side tracking moves this process to a cloud server you control.
The goal is to bypass ad blockers, improve data privacy and control, and improve reliability in HubSpot.
Why You Need Server-Side Tracking for HubSpot?
HubSpot is a marketer’s favorite for tracking leads, but when that data directly influences your lead scoring, workflows, or ad-spending decisions, consider setting up server-side tracking so you don’t miss a single data point.
Key Benefits
- Server-side tracking can queue failed requests, retry temporary failures, and alert your team when delivery fails. This is useful when HubSpot returns 429 rate-limit errors.
- Validate emails, normalize phone numbers and UTM values, and match event names and property types to HubSpot’s schema before the data reaches your CRM.
- HubSpot’s custom-event API supports batches of up to 500 event completions and up to 1,250 requests per second, making server-side tracking useful for high-traffic websites and large-scale lead generation.
- Serving forms through your own domain can help visitors load and submit them even when third-party HubSpot form domains are blocked. A blocked form can mean a lead you paid to acquire never reaches your CRM.
- Server-set cookies can last longer than JavaScript-set cookies in some browsers, including Safari. However, Safari’s additional privacy protections can still limit their lifespan depending on your server setup.
- Server-side APIs can send custom behavioral events, product interactions, form submissions, and other activity to HubSpot without depending on the visitor’s browser.
- You decide which information is sent to HubSpot and when. This gives you more control over data minimization, cleaning, and consent enforcement.
- HubSpot’s CRM Objects API can handle contact data, while its Custom Behavioral Events API can handle interactions and other custom activity. In other words, you’re moving the tracking work from the browser to your server rather than giving up functionality.
- With fewer tracking gaps, more of the leads and behavioral data you already generate can reach HubSpot and feed your lists, workflows, lead scoring, attribution reports, and other marketing decisions.
What You'll Need Before You Start
Have these prerequisites ready before starting:
- A HubSpot account with permission to create a private app and, if using behavioral events, access to the relevant event functionality.
- A GTM account with a web container installed on the website.
- A server container created in GTM.
- A server-side GTM hosting provider, such as TAGGRS, Stape, Google Cloud Run, or another supported deployment method.
- A first-party tracking endpoint on your own domain, such as https://measure.example.com.
- A working website data layer or a Google tag/GA4 setup that can forward page and event data to the server container.
- A consent-management setup capable of passing consent status into GTM—not only HubSpot’s own cookie banner.
- A clear event plan: which events should create/update contacts, and which should become custom behavioral events.
How to Set Up HubSpot Server-Side Tracking: 8 Steps Setting UP GTM, Create HubSpot Private App to Test & Run
The steps are pretty similar to Meta or WordPress server-side tracking using GTM.
The website action happens first → gets pushed to the dataLayer → Web GTM container → forwarded (via a GA4 config/transport setting) to your Server GTM container, hosted on your own subdomain → a tag inside the server container calls HubSpot’s API using a private app token → HubSpot creates/updates a contact or logs a behavioral event.
That’s it, actually. This is the process we follow to set up HubSpot tracking for our clients.
Here is a detailed way you can follow to set up your own.
Step 1. Set up the infrastructure
You need a GTM container, a server GTM container, a hosting provider, and a first-party subdomain. You already have this on your site (it’s what fires your existing pixels/tags). No action needed unless it’s missing.
Set up your server-side GTM container. Follow this process in Google Tag Manager: go to
Admin → Container → Create Container → give it a name like “yoursite – Server” → choose Server as the container type.
You’ll have two GTM containers running side by side from now on. You will need a hosting provider for the server container. You can choose anyone or look at these options.
- Stape or TAGGRS managed hosting built specifically for server-side GTM, easiest to set up, usually paid monthly
- Google Cloud Run or App Engine, self-hosted on your own Google Cloud project, more setup work, cheaper/free at low volume
A first-party subdomain pointed at that server container. This is the step that makes the tracking count as first-party instead of third-party, and it’s the whole point of doing this server-side. Pick a subdomain like measure.yourdomain.com or track.yourdomain.com, then add a DNS record for it following your hosting provider’s instructions (they’ll usually give you a CNAME record to add).
Step 2. Plan your events and get a HubSpot token
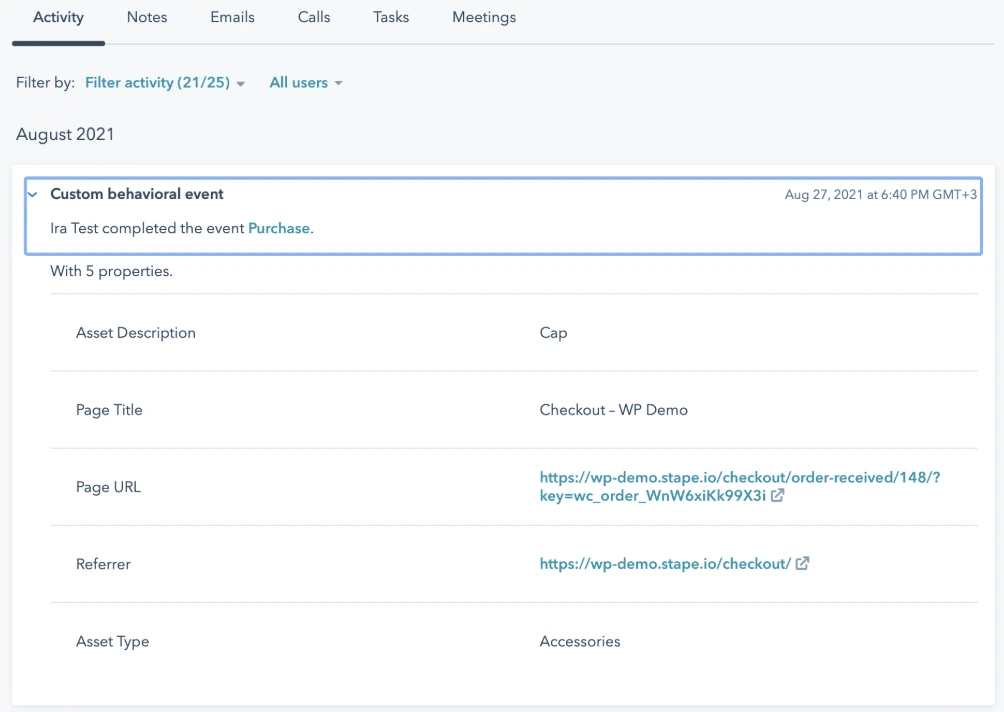
Plan your events because if you skip defining the event in HubSpot first and just build the GTM tag straight away, the tag can fire successfully and show a green checkmark in GTM. But HubSpot discards the event because it doesn’t recognize it.
It saves you from rebuilding tags later once you realize you mapped the wrong thing.
For every website action you want in HubSpot, note: what triggers it, whether it should create/update a contact or log a behavioral event, and what identifier (usually email) HubSpot needs to know who it belongs to.
Decide contact-update vs. behavioral event. Use Create/Update Contact when the action should change a CRM record (form fills, signups, and lifecycle changes). Use a Custom Behavioral Event when it’s just an interaction you want to log for reporting/segmentation (page viewed, video watched, feature used).
If you’re using behavioral events, define them in HubSpot first.
Go to HubSpot → Data Management → Event Management → create the custom event → note down its internal name.
You’ll need this exact internal name later when configuring the tag; a mismatch is the #1 reason behavioral events silently fail to appear.
Create HubSpot Private App and get access token
Your server container needs a way to actually authenticate with HubSpot’s API when it calls it. HubSpot no longer uses the old API key method. Instead, generate an access token from a private app. It serves the same purpose, authenticating your requests, but is more secure and gives you fine-grained control over what your integration can do. Without it, the HubSpot tag in GTM has no credential to send along, so every request would just get rejected.
The process is simple.
Sign in to your HubSpot account and go to Settings. In the left sidebar, go to Account Management and select Private Apps.
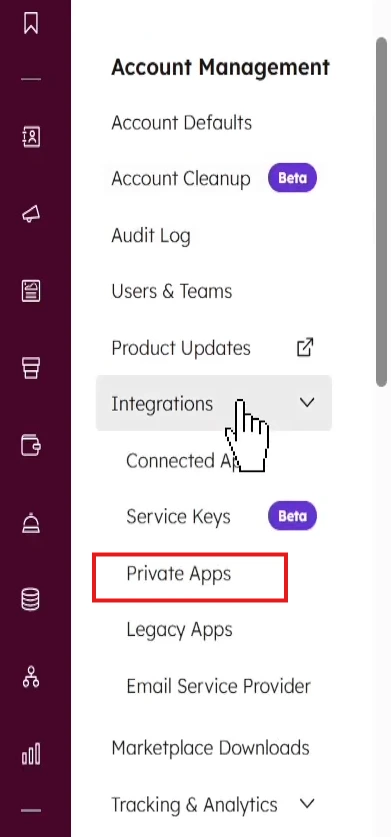
Choose Create a private app and give your app a name. Go to Scopes, click Add new scope, and select the scopes your private app needs. Scopes define permissions, such as what your token can read or write. For example, you might grant read-only access to contacts or give write access to CRM objects if your integration creates or updates records.
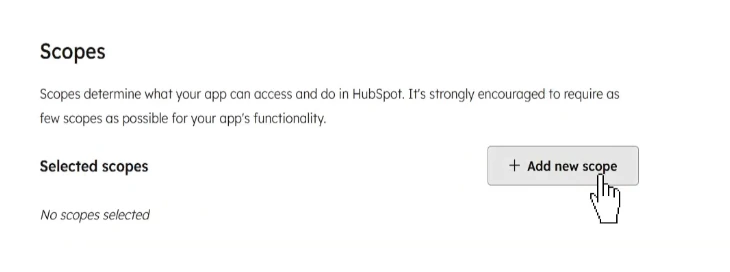
- Apply the least privilege principle and only select the scopes your integration truly needs. You can adjust the scopes later if your requirements change.
- After choosing the appropriate scopes, click Update to save those permissions, then click Create app. If prompted, continue creating to finish the setup.
- Open the Auth tab for your new app and click Show token to reveal your access token. Treat this token like a password. Never commit it to public repositories or place it directly in client-side code. Use environment variables or a secure secret manager.
- Finally, click Copy to copy the token. Use it in your API requests by adding an authorization header with the value Bearer followed by the token.

Store the token as a server-side GTM variable
Do not store the token inside a tag directly. In your server container, follow the paths:
Variables → New → create a Constant variable named something like Constant – HubSpot Token → paste the token as its value.
Every HubSpot tag you build later will reference this one variable, so if you ever need to rotate the token, you change it in exactly one place.
This step is important because if you paste that same token directly into every HubSpot tag instead, you end up with the same secret duplicated in five or six places. The moment you need to rotate it, you have to remember and edit every single tag that used it, and it’s easy to miss one. Storing it once as a server-side variable means every tag just references that one variable.
Step 3. Connect the web container to the server container
Right now, your web container sends events straight to Google’s collection endpoint. This step reroutes them through your server container first.
Find your Google tag / GA4 Configuration tag. In your web GTM container, open the tag that fires your GA4 config. It can be named something like “GA4 Configuration” or “Google tag”.
Set its transport/server-container URL to your subdomain. Depending on your GTM version this field is called “Server Container URL” or “Transport URL.” Set it to the subdomain you set up in Step 1, e.g. https://measure.yourdomain.com.
Confirm the server container can receive it. In the server container: Clients → confirm the GA4 Client exists and is enabled. This is what claims incoming requests sent in GA4 format. Almost every setup uses this client by default; you shouldn’t need to build a custom one.
Till now, you’re just making sure browser events have a path to your server before you build anything that acts on them.
Step 4. Push the right data into the data dataLayer
The event name pushed to the dataLayer doesn’t exactly match what the trigger in web GTM is listening for. A trigger set to “Event equals hubspot_lead_submit” will not fire on hubspot_Lead_Submit or hubspot-lead-submit, GTM matches this. Keep event names identical, character for character, between the dataLayer push and the trigger condition.
- For each action in your tracking plan, push a structured dataLayer event. Work with a developer or add this yourself if you can edit the site’s code/tag manager to push something like this on form submission:
					dataLayer.push({
  event: 'hubspot_lead_submit',
  email: 'visitor@example.com',
  first_name: 'Jane',
  last_name: 'Doe',
  form_name: 'Request a Demo',
  page_path: '/request-demo/',
  utm_source: 'google',
  utm_medium: 'cpc',
  utm_campaign: 'demo_campaign'
});
And for a behavioral event like a pricing page view:
dataLayer.push({
  event: 'hubspot_pricing_viewed',
  email: 'visitor@example.com',
  page_path: '/pricing/',
  plan_viewed: 'professional'
});
Only push the email field once the visitor has actually given it.
In the web container, create a Custom Event trigger for each event name. E.g. a trigger that fires when “Event equals hubspot_lead_submit”. These triggers will fire the GA4 event tag that carries this data through to your server container.
Make sure the GA4 event tag actually forwards these fields as parameters. If a field isn’t listed as a parameter on the tag, it won’t reach the server container even if it’s sitting in the dataLayer.
Step 5. Connect your website with HubSpot using server-side tracking
This is where server-side event data actually turns into HubSpot contact records or logged events.
Add the HubSpot tag template: In the server container: Templates → Tag Templates → Search Gallery → search “HubSpot” → add the template to your workspace.
Create a “Create or Update Contact” tag: Tags → New → choose the HubSpot tag type → set action type to Create/Update Contact. Configure:
- Private app token → your Constant – HubSpot Token variable from Step 2
- Contact email → the email variable coming through from Event Data
- Contact properties → map each field you’re sending (first name, last name, form name, page path, UTM fields) to its matching HubSpot property
Email is the minimum required field, it’s what HubSpot uses to decide whether to create a new contact or update an existing one.
If you’re sending behavioral events, create a separate tag per event: Same tag type, but set action type to Track Custom Behavioral Event. Configure:
- Private app token → same shared variable
- Contact email → same email variable
- Event internal name → the exact internal name you noted in Step 2c (not the display label)
- Event properties → each property, using its internal name too
Double-check every internal name against HubSpot’s Event Management screen.
Step 6. Wire up triggers and consent rules
Each HubSpot tag needs its own trigger telling it exactly when to fire — and a consent condition telling it when not to.
- Create a trigger per tag, in the server container. For the contact-update tag: “Event Name equals hubspot_lead_submit AND Email is not empty.” The email-not-empty condition matters — without it, a request with no identifier can create broken or duplicate contact records. For a behavioral event tag: “Event Name equals hubspot_pricing_viewed” (adjust per event).
- Never fire the contact tag on generic events.
- Add a consent condition to every HubSpot tag or its trigger.
- Strip out anything sensitive before it reaches HubSpot.
- Save your work but don’t publish yet.
Step 7. Test in preview mode — both containers at once
Open Preview mode on both containers at the same time and run both together.
To test, visit your test form, submit it, then check if everything is working properly and in HubSpot itself: search for your test contact and confirm it was created/updated with the right property values. Test each behavioral event the same way.
Test the failure cases too, submit with an empty email, submit twice, deny consent, withdraw consent, submit with a different email as a returning visitor.
Step 8. Run in parallel, then publish
Keep HubSpot’s existing browser tracking code active. Don’t remove it yet, even once your server-side setup tests clean. Run both side by side for a short comparison window (a week or two is typical). Decide which system is the source of truth for each event, and have a cleanup plan. Publish in this order: server container first, then web container. Publishing this way means the server side is ready to receive before the web side starts sending through the new path.
Monitor closely for the first 1–2 weeks: server request volume, HubSpot API errors, contact duplicates, missing emails or properties, and whether the parallel browser tracking is now double-counting anything.
How to Track HubSpot Forms Server-Side
Follow the exact steps to track the HubSpot forms server-side.
Add the form event listener to your site
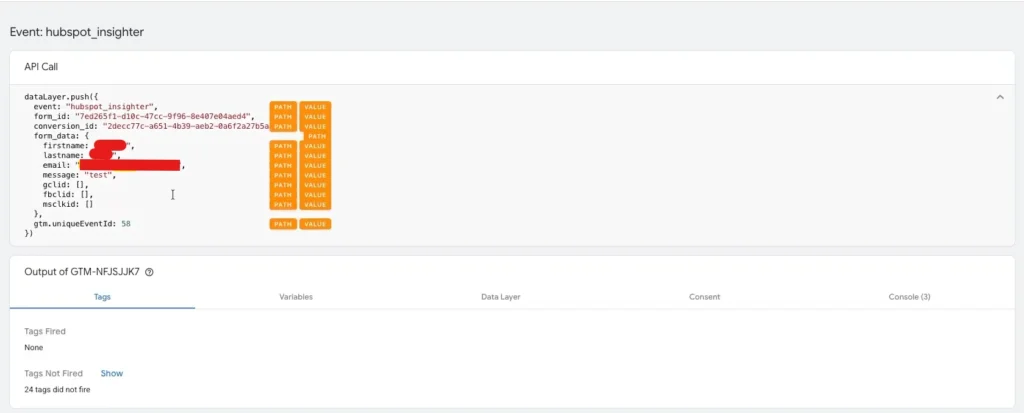
First, track the HubSpot form. Create a custom HTML code and check the HubSpot form and tracking pixel for both browser-side and server-side tracking.
Quickly fill up the form and submit it. After the form is submitted, you can see the data layer event being pushed properly.
Send form data to your server container
Now create a trigger and preview the GTM container for both browser-side and server-side tracking in real time.
In the Event Manager, you can see the page view event. Here, both the server-side and browser-side events are working.
Then add the tracking scope and submit the form. You can see that the server-side and browser-side events work properly.
Set up deduplication with event_id
The server-side and browser-side events are both being sent, so they need to be deduplicated.
You can see that the server-side and browser-side events are duplicated and then properly deduplicated. The contact event works properly with the correct deduplication.
The email ID and the demo ABC ID are also being sent with the event.
Test the form submission end-to-end
Now test the HubSpot form from the CRM backend.
Suppose this is a lead that was filled up on the website and stored in the CRM. After a couple of days, it can become a main lead or sales-qualified lead.
When the main event is done, meaning the deal is won or it becomes a sales-qualified lead, the event can go back to Meta. Meta can then target those people who are your actual customers.
Choose Sales Qualified Lead as a new event and check that the sales-qualified lead event works properly. You can change the normal lead to a sales-qualified lead and verify that the event works properly.
How To Track HubSpot Meeting Bookings
To track HubSpot meeting bookings, capture the booking event when a meeting is confirmed, send it through your server container, and forward the same data to HubSpot, Meta, and Google Ads. Then test a booking to make sure all three platforms receive it correctly.
Set up the meeting booking listener
Start by picking the event that actually means “a meeting got booked” — usually a HubSpot meetings link confirmation, or a booking confirmation your calendar tool fires. Push that as a dataLayer event on your site the moment it happens.
Send booking data to your server container
Same pattern as everything else here: the booking event goes through your web container’s GA4 tag, which is already pointed at your server subdomain, so it lands in the server container automatically once the event fires.
Map booking details to Meta and Google Ads events
Once the booking data is in your server container, add a Meta CAPI tag and a Google Ads conversion tag alongside your HubSpot tag, and map the same email, meeting type, and page path fields into each. One event, three destinations.
Verify the booking event fires correctly
Book a real test meeting, then check server preview: confirm the request arrived, confirm each of the three tags (HubSpot, Meta, Google Ads) fired, and check the meeting actually shows up on the contact’s HubSpot timeline.
How To Track HubSpot Live Chat Conversions
To track HubSpot live chat conversions, create a HubSpot workflow that identifies qualifying chats, send the event to your server container through a webhook, and then forward it to Meta CAPI and GA4. Finally, test a real chat to confirm the conversion reaches all three platforms and appears correctly in the contact timeline.
Create a HubSpot workflow for chat events
In HubSpot, build a workflow that triggers when a chat conversation meets your definition of a “conversion”, a qualifying question answered, a certain chat outcome, whatever counts for you. Have that workflow call a webhook when it fires.
Send the webhook to your server container
Point that webhook at an endpoint on your server container instead of a generic URL. Your server container can receive it as an incoming request just like it receives browser events, so it’s ready to hand off to other tags from there.
Route chat events to Meta CAPI and GA4
Once the webhook lands in the server container, add tags that forward the same event to Meta CAPI and GA4, mapping over whatever contact and conversation details the webhook carries.
Test with a real chat conversation
Run through an actual chat that should qualify as a conversion, then confirm the workflow fired, the webhook reached your server container, and the event shows up in Meta, GA4, and HubSpot’s timeline for that contact.
How to Track Conversions in Google Ads in HubSpot
It’s simple: just add the Google Ads tag to your HubSpot pages and place the conversion event snippet on the page where the conversion happens. For Meta or GA4, use the relevant integration, GTM, or API to send the same conversion data.
Step 1: Open your HubSpot settings
In HubSpot, go to Settings → Content → Pages.
Step 2: Add the Google Ads global site tag
Under Site Header HTML, paste your Google Ads global site tag and click Save.
Step 3: Add the conversion event snippet
Go to Content → Website Pages and open your conversion or thank-you page.
In the page editor, go to Settings → Advanced → Head HTML and paste the Google Ads conversion event snippet.
Step 4: Publish the changes
Click Update or Publish to make the changes live.
Check out our guide on How to Set Up Google Ads Conversion Tracking Using Google Tag Manager, where we cover how to verify that your Google Ads conversion tracking is working, tracking audit checklists, useful tips, and other important topics.
Send HubSpot data to Meta or GA4
If you want to send the same HubSpot conversion data to Meta or GA4, the process is similar, but you’ll use the relevant Meta or GA4 tracking setup instead of the Google Ads tag.
For Meta, connect your HubSpot data with Meta using the relevant integration or API, then map the conversion or contact event you want to send.
For GA4, connect HubSpot with GA4 and send the relevant events or conversions through the available integration, GTM, or API setup.
The main idea stays the same: capture the conversion in HubSpot → send the relevant data to the platform → test that the event is received correctly.
The Mistakes We See Most Often in HubSpot Server-Side Setups
We got 9 clients who set up their server-side tracking in HubSpot, with everything seemingly on point, but something was silently spoiling the whole effort. We audited the entire setup, and the the most common issues we found were these:
Missing visitor identifiers: If email or the hubspotutk value isn’t passed with the event, HubSpot may not connect the activity to the right contact.
Not passing consent signals: Server-side tracking still needs to respect user consent. Make sure consent status is included in your server-side triggers before sending data.
Using the wrong cookie setup: Moving tracking server-side doesn’t automatically extend cookie life. A first-party tracking subdomain may be needed for the intended cookie behavior.
Incorrect Private App permissions: Missing CRM scopes can prevent your server-side functions from reading or updating HubSpot records. Check your permissions and error logs when actions fail.
Overloading serverless functions: HubSpot serverless functions have execution limits. Too many API calls in one function can cause timeouts, so break complex processes into smaller functions where needed.
Missing GA4 events: If your server-side setup sends events but they aren’t appearing in GA4, the issue may be with the event configuration or parameters.
Google Ads conversions not tracking: Incorrect conversion tags, event parameters, or duplicate tracking can stop Google Ads conversions from being recorded properly.
HubSpot Server-Side Tracking Limitations and Best Practices
Server-side tracking improves the delivery of high-value events, but it is not a way to bypass consent requirements, browser privacy controls, or HubSpot’s native browser-tracking model.
- Obtain consent before sending non-essential marketing or analytics data.
- Do not send unnecessary personal data, sensitive data, or raw form fields unless your legal basis and data-governance policy allow it.
- Honor opt-outs across both your web and server-side tracking flows.
- Keep HubSpot’s browser tracking code for consented page views, visitor journeys, and native web analytics where those insights matter.
- Use server-side tracking for verified form submissions, CRM updates, payments, bookings, product events, lead-status changes, and other backend-confirmed conversions.
- Use a stable identifier, such as a HubSpot contact ID, email where appropriate, or an internal customer ID, so server-sent events can be associated with the right CRM record.
How Tagassists Sets Up HubSpot Server-Side Tracking for You?
Is Your HubSpot Tracking
Missing Data?
Tagassist helps businesses implement server-side tracking for more accurate analytics and conversion reporting.
Online tutorials, setup guides, and AI are here to guide you on how to set up your website tracking or specifically HubSpot. But we know where you will get stuck because this is a common pattern we always see such as configure server-side tracking, connect the right events, orpass data correctly. And after scratching your head for hours, you will need a professional in the end. At Tagassists, we help with paid ads tracking setup and analytics setup.
Check our case studies: De Jure Academy Case Study, FundedNext Scale, and how we helped businesses scale with the right tracking setup.
Honestly, it takes a lot of time and effort. Even tech professionals often run into difficulties, but we have been doing this successfully for years.
Also, today, to survive in the industry, you have to spend on the right leads and make accurate decisions, with nothing wasted. While HubSpot’s built-in tracking code helps a lot, businesses that don’t want to miss a single lead need server-side tracking.
Contact us, and we will audit your requirements and help you with the tracking setup for HubSpot or any other platform.
Frequently asked questions
Does HubSpot support server-side tracking?
Yes. HubSpot can work with server-side tracking through integrations and external tracking tools.
Do I need a developer to set it up?
Not always. Basic setups can be handled without a developer, but more advanced server-side tracking may require technical help.
How much does it cost?
It depends on the tracking method and tools you use. HubSpot itself may not charge an additional fee, but third-party tools can have their own pricing.
Can I still use HubSpot's native tracking with this?
Yes. You can use native HubSpot tracking alongside server-side tracking, as long as the setup avoids duplicate events.
Does this work with non-HubSpot forms?
Yes. Server-side tracking can track conversions from non-HubSpot forms when the required data is captured and passed correctly.
Why aren't my events showing in Meta/Google Ads?
Common reasons include incorrect event setup, missing parameters, consent issues, or a delay before the platforms process the data.
How long does the setup take?
A basic setup can take a few hours. More complex tracking setups may take longer, depending on your website and integrations.
Do I need to disable the HubSpot Meta pixel first?
No. You generally don’t need to disable it, but your setup should be checked for duplicate event tracking.

Abdullah Al Zahid
Abdullah Al Zahid is the CEO & Founder of tagassists and a media buying specialist with over 4 years of experience. He has managed more than $7.5M in advertising spend, helping businesses grow through effective digital marketing, web analytics, and tracking solutions.