
How to Track Outbound Link with Google Analytics 4
Last Update: April 26, 2026
There are two main methods to track outbound link clicks: the quick Enhanced Measurement way and the advanced Google Tag Manager way.
If you want the easiest setup, you can turn on outbound click tracking in GA4 Enhanced Measurement, and Google will start collecting those clicks automatically. If you want more flexibility, custom events, or better reporting control, you can use Google Tag Manager to track outbound link clicks in a more advanced way.
Today, we will show both methods in very detailed, step-by-step instructions:
- GA4 Enhanced Measurement (No GTM Needed)
- Google Tag Manager (Advanced Control)
Stick with us, you’ll also learn how to verify tracking and view outbound link reports in GA4.
Track Outbound Clicks Without the Hassle
We set up Google Analytics 4 and Google Tag Manager for accurate tracking—done right, done fast.
What are Outbound Links?
An outbound link (also called an external link) is any hyperlink on your website that points to a different domain. For example, if your site is yoursite.com and you have a link that takes users to google.com or facebook.com, those are outbound links.
They are different from internal links, which keep users within your own domain.
- Note: GA4 already knows the difference. When Enhanced Measurement is active, it automatically adds an outbound: true parameter to any click event that leaves your domain.
Why Should You Track Outbound Links?
Tracking outbound links gives you powerful insight into user behaviour that pageviews alone can never reveal. Here’s why it matters:
- Understand user journey: See where visitors go after leaving your site.
- Measure affiliate performance: Track which affiliate partner links get the most clicks.
- Evaluate content quality: If users click outbound links heavily, are they finding what they need on your site?
- Spot broken link opportunities: Find dead external links and replace them.
- Set conversion goals: Mark an important outbound click (e.g., a job board link) as a conversion event.
How to Track Outbound Link Clicks?
There are two main methods to track outbound link clicks in Google Analytics 4: Enhanced Measurement and the Google Tag Manager (GTM) method. Both help you understand when users click links that take them away from your website. But they differ in how much control you have.
Enhanced Measurement
- Zero setup time
- Works out of the box
- No GTM required
- Limited customisation
GTM Method Recommended
- Full control over what fires
- Custom event names
- Filter specific domains
- More reliable data
If you need a fully accurate and business-ready setup, you can also consider Tracking Setup Services to ensure everything is tracked properly across platforms.
Method 1: Track Outbound Link Clicks with GA4 Enhanced Measurement (No GTM Needed)
The fastest way you can use to start tracking outbound links is by using GA4’s built-in Enhanced Measurement feature. No code, no GTM; just a toggle in your GA4 settings.
Follow these simple three steps:
1. Go to GA4 Admin → Data Streams
In your GA4 property, click Admin (the gear icon at the bottom left). Under the Property column, click Data Streams, then select your web data stream.
Screenshot Placeholder. GA4 Admin → Data Streams → Select your web data stream.
2. Open Enhanced Measurement Settings
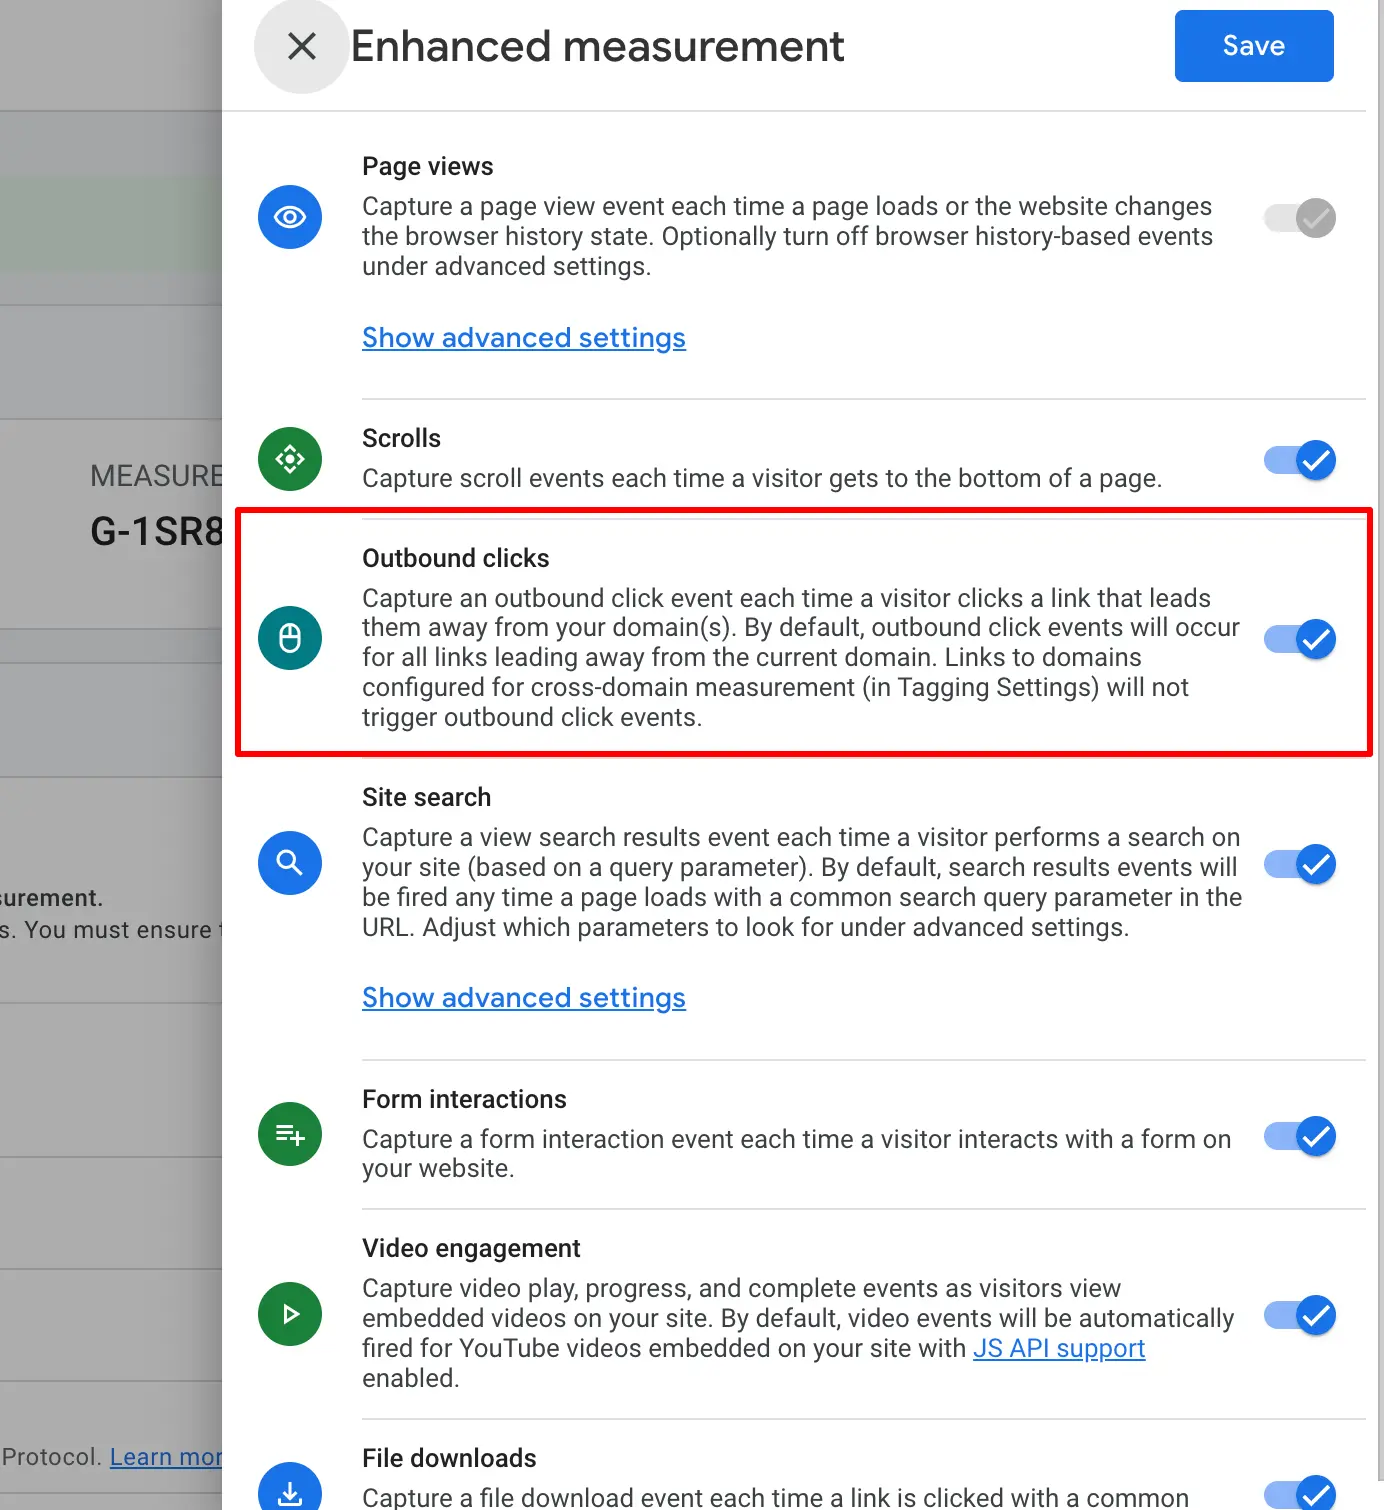
Inside your data stream, find the Enhanced Measurement section. Click the gear/settings icon next to the toggle to open individual event settings.
GA4 Enhanced Measurement settings panel, showing all toggles, including Outbound Clicks.
3. Enable Outbound Clicks
Make sure the Outbound clicks toggle is turned ON. Then click Save. Outbound clicks toggle turned ON inside Enhanced Measurement settings.
Now, GA4 will now automatically fire a click event with outbound: true for every external link click. The parameters captured are listed below.
Parameters Captured Automatically by Enhanced Measurement
Parameter | Description | Example Value |
link_url | The full URL of the clicked link | https://partner-site.com/page |
link_domain | The destination domain | partner-site.com |
link_text | The anchor text of the link | “Read more here” |
link_classes | CSS class of the clicked element | btn-primary |
outbound | Always true for external links | true |
Method 2: Track Outbound Link Clicks with Google Tag Manager (Advanced)
While Enhanced Measurement is convenient, Google Tag Manager gives you far more control. You can fire a dedicated custom event (e.g. outbound_link_click), filter specific domains, attach extra parameters, and avoid noise from internal clicks.
This method requires your GTM container snippet to already be installed on your website and your GA4 configuration tag to already be set up in GTM.
Important: If you are using GTM for outbound tracking, it is recommended to disable the Outbound clicks toggle in Enhanced Measurement to avoid double-counting.
You can also explore our GTM and analytics services for expert implementation.
However, follow these 6 simple steps.
Step 1: Enable Built-in Variables in GTM
GTM has several built-in variables that capture information about link clicks. We need to make sure they are enabled before we can use them in triggers and tags.
1. In GTM, go to Variables → Configure
In the left sidebar of your GTM workspace, click Variables. Then click the Configure button in the Built-In Variables section.
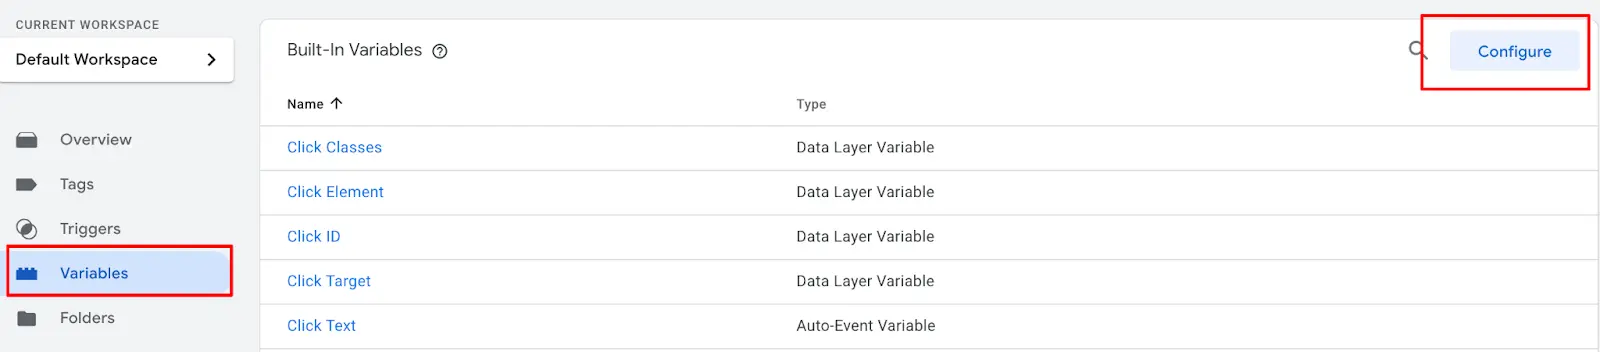
GTM Variables section → Configure button (top right of Built-In Variables panel).
2. Enable Click Variables
Scroll down to the Clicks section and enable all of the following variables:
- Click Element
- Click Classes
- Click ID
- Click Target
- Click URL
- Click Text
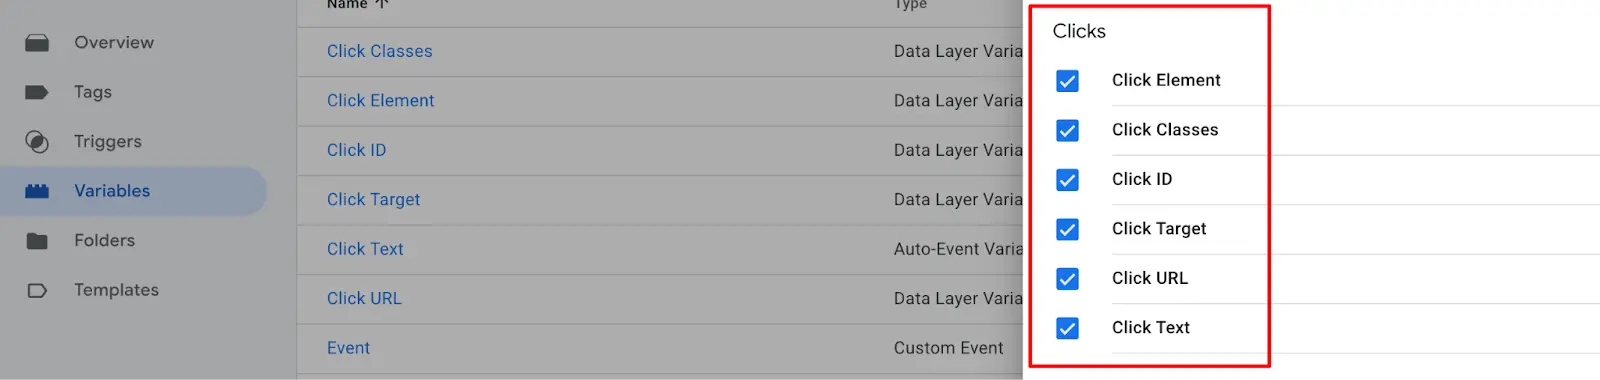
GTM Built-in Variables configuration, Clicks section with all variables checked/enabled
Step 2: Create a Custom Variable to Detect Outbound Links
Now we’ll create a Custom JavaScript Variable that returns true if the clicked link goes to a different domain than your website.
1. Go to Variables → New (User-Defined)
In the Variables section, scroll down to User-Defined Variables and click New.
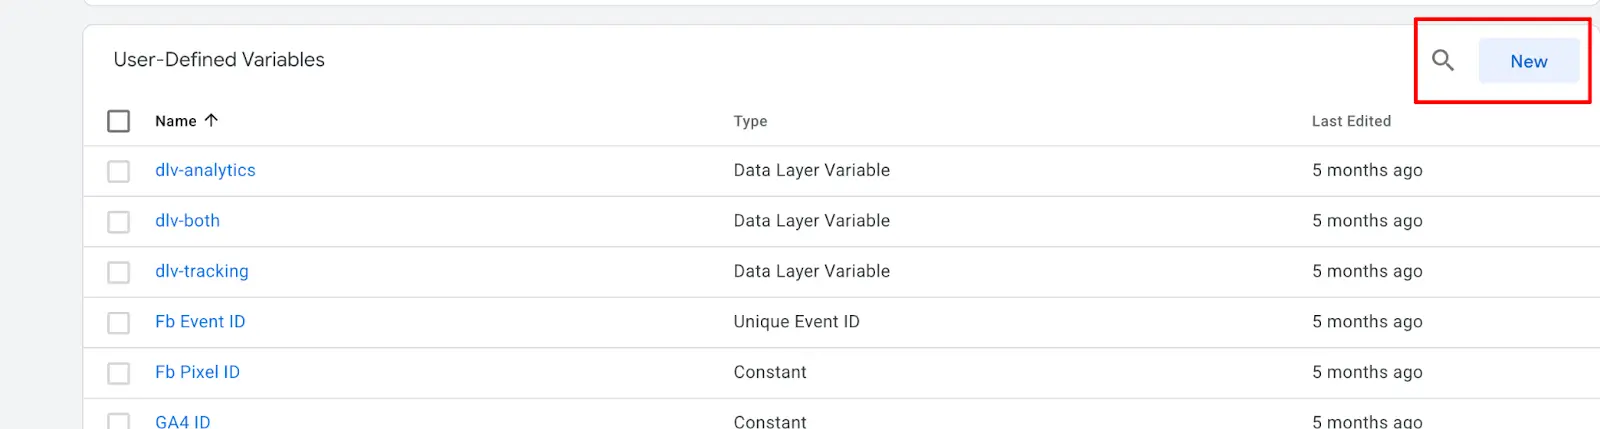
GTM User-Defined Variables section → New button to create a custom variable
2. Configure as Custom JavaScript Variable
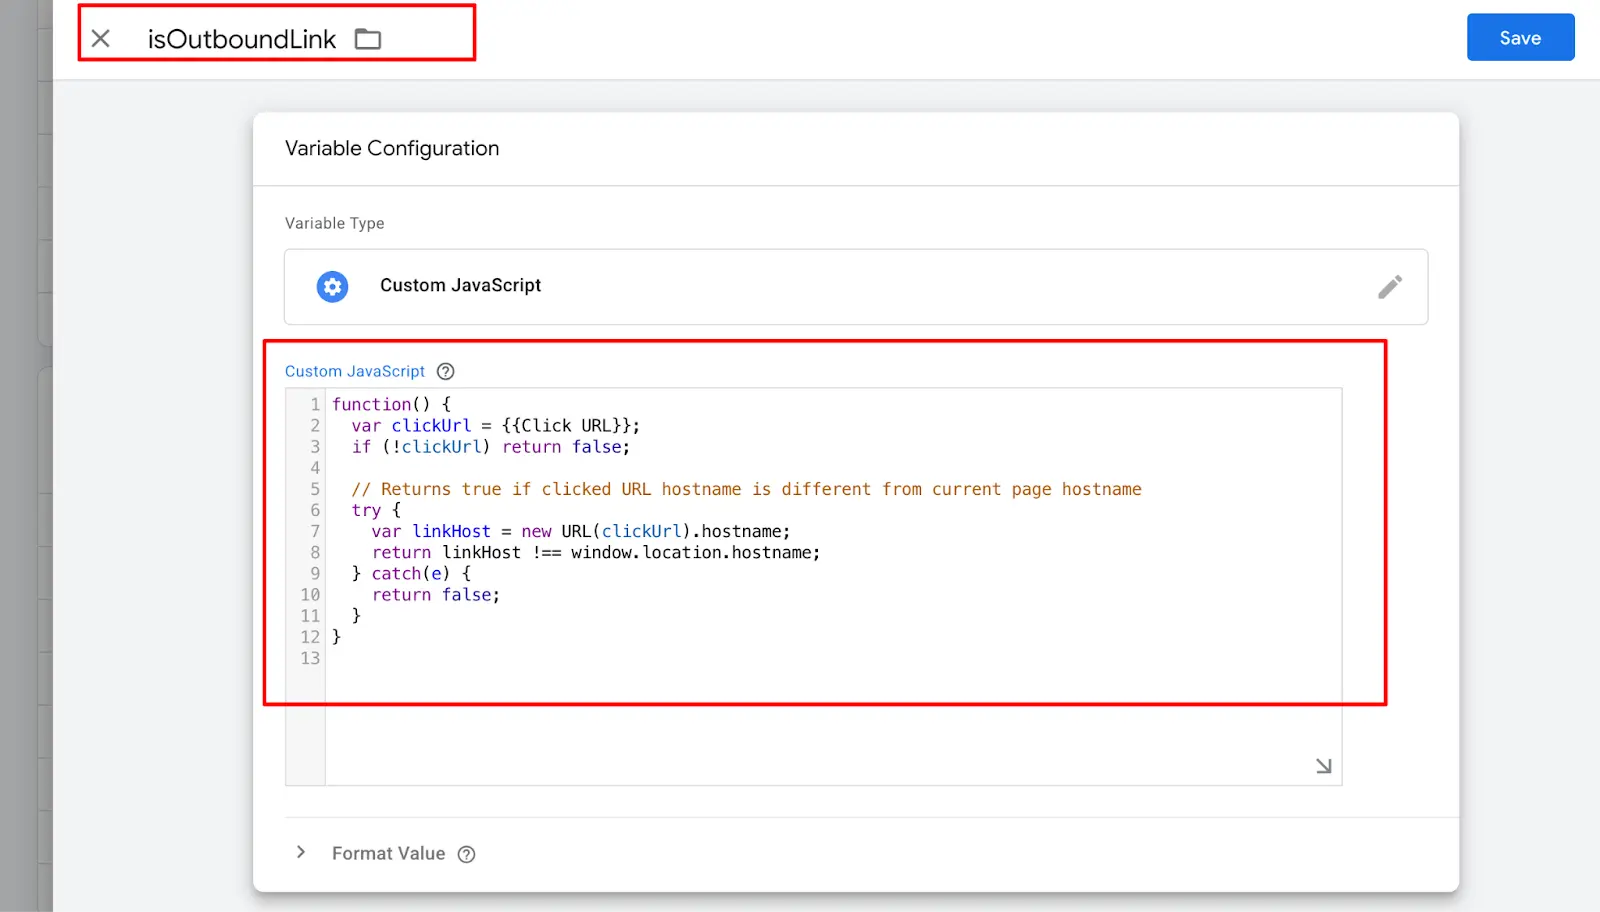
Name the variable isOutboundLink. Click Variable Configuration and select Custom JavaScript. Simply paste the following code:
					function() {
  var clickUrl = {{Click URL}};
  if (!clickUrl) return false;

  // Returns true if clicked URL hostname is different from current page hostname
  try {
    var linkHost = new URL(clickUrl).hostname;
    return linkHost !== window.location.hostname;
  } catch(e) {
    return false;
  }
}
GTM Custom JavaScript Variable configuration, named “isOutboundLink” with the JS code entered
Step 3: Create the Outbound Link Click Trigger
Now we create a trigger that fires only when a link click points to an external domain.
1. Go to Triggers → New
In the left sidebar, click Triggers, then click New. Name it Trigger – Outbound Link Click.
2. Choose "Just Links" as the Trigger Type
Click Trigger Configuration and select Click → Just Links.
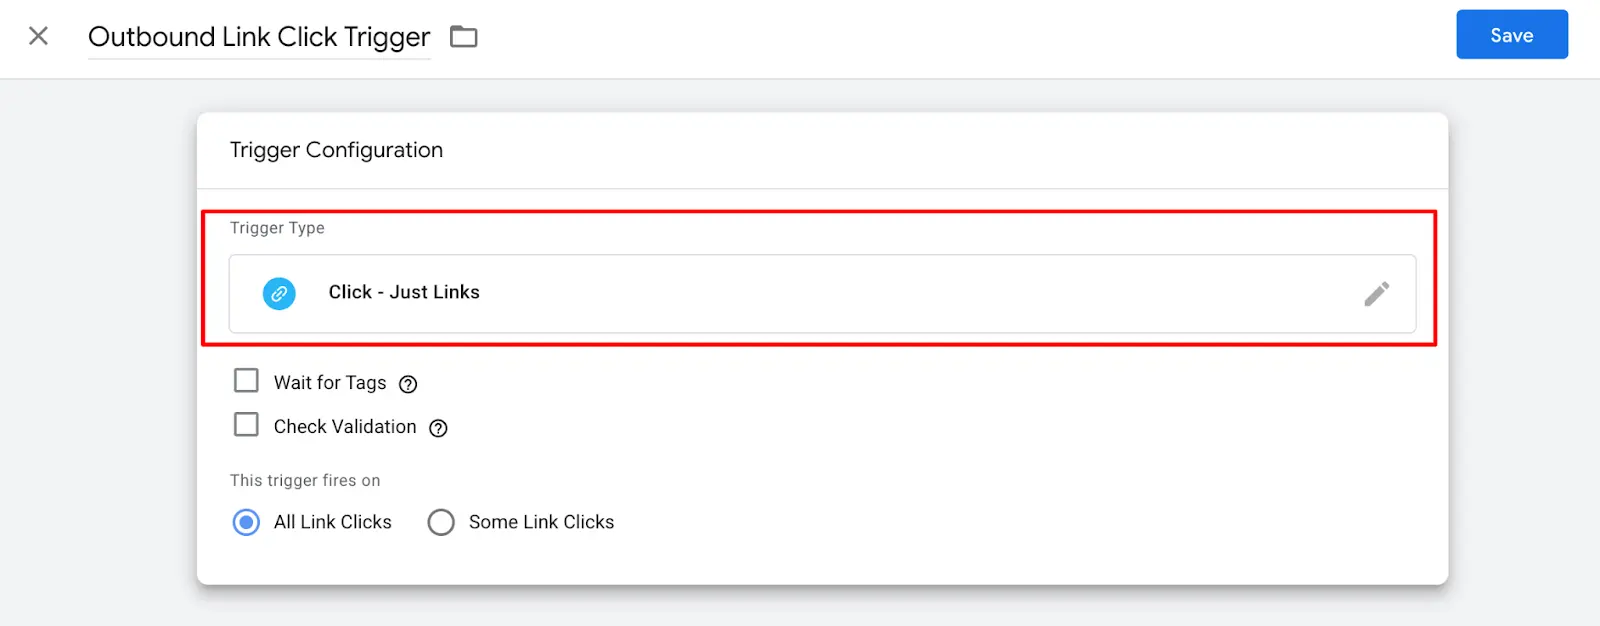
GTM Trigger configuration, selecting “Just Links” as the trigger type under the Click category
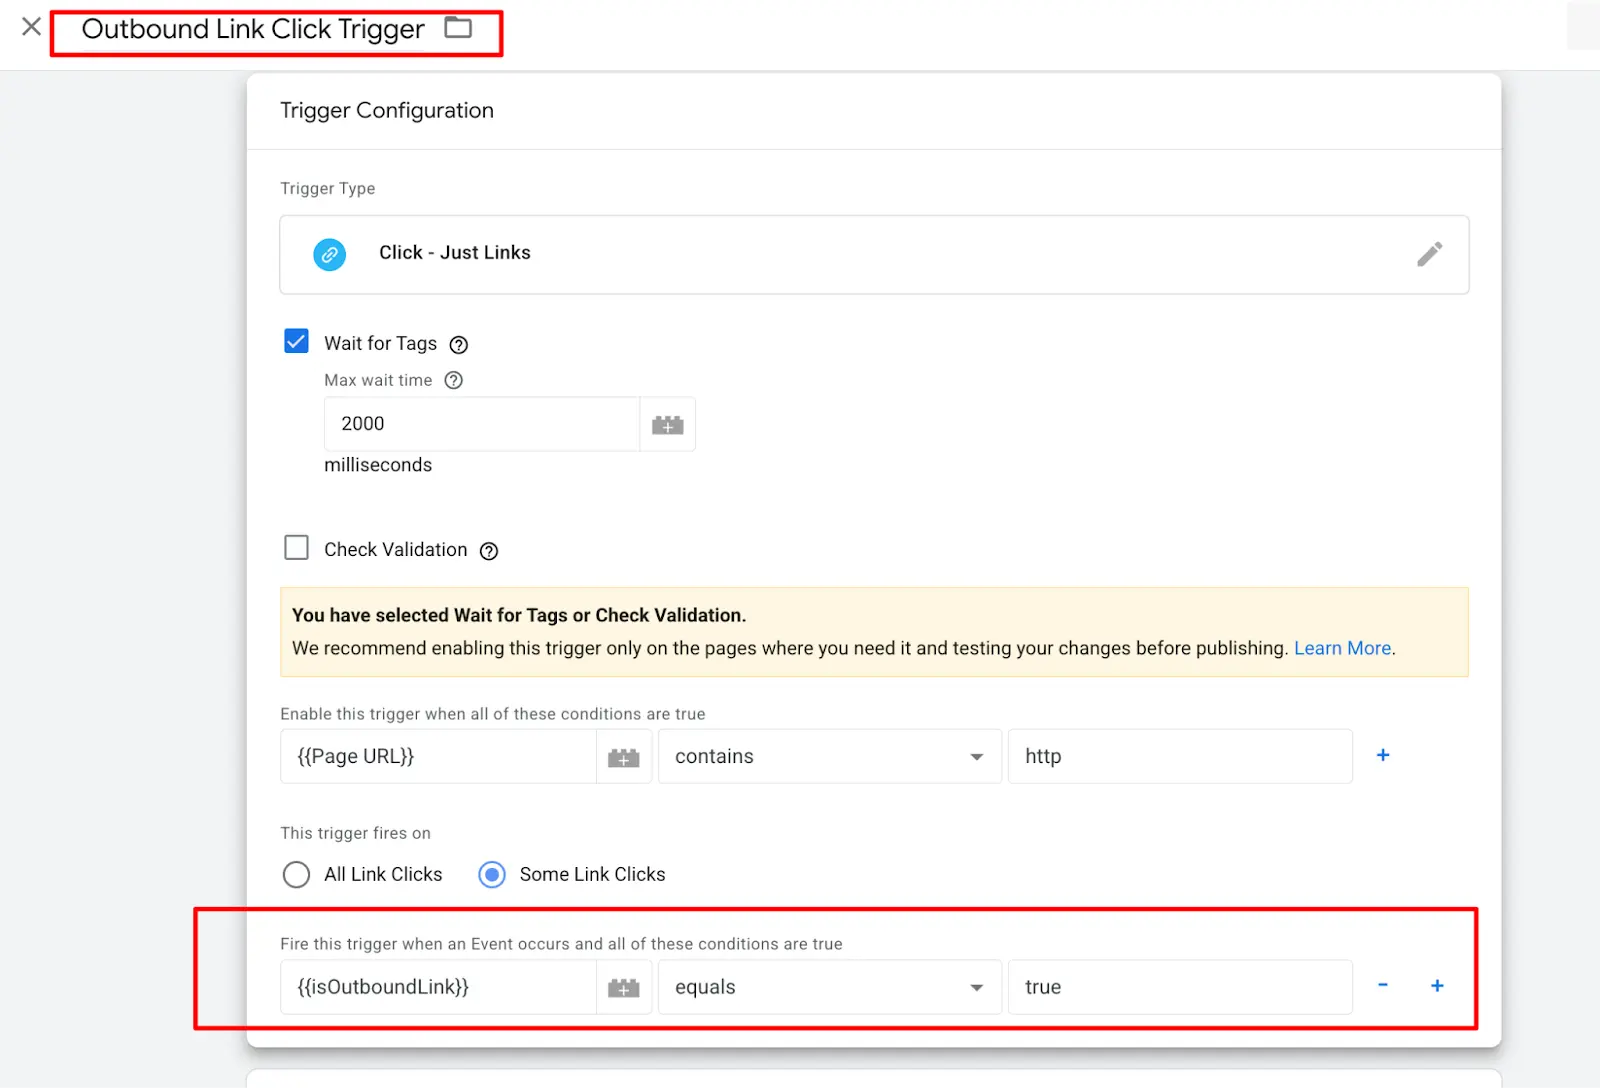
3. Configure the Trigger Conditions
Set the trigger to fire on Some Link Clicks (not All). Then set the condition as:
- Variable: isOutboundLink
- Operator: equals
- Value: true
Also, make sure Wait for Tags is checked (set to 2000ms) so the tag fires before the browser navigates away.
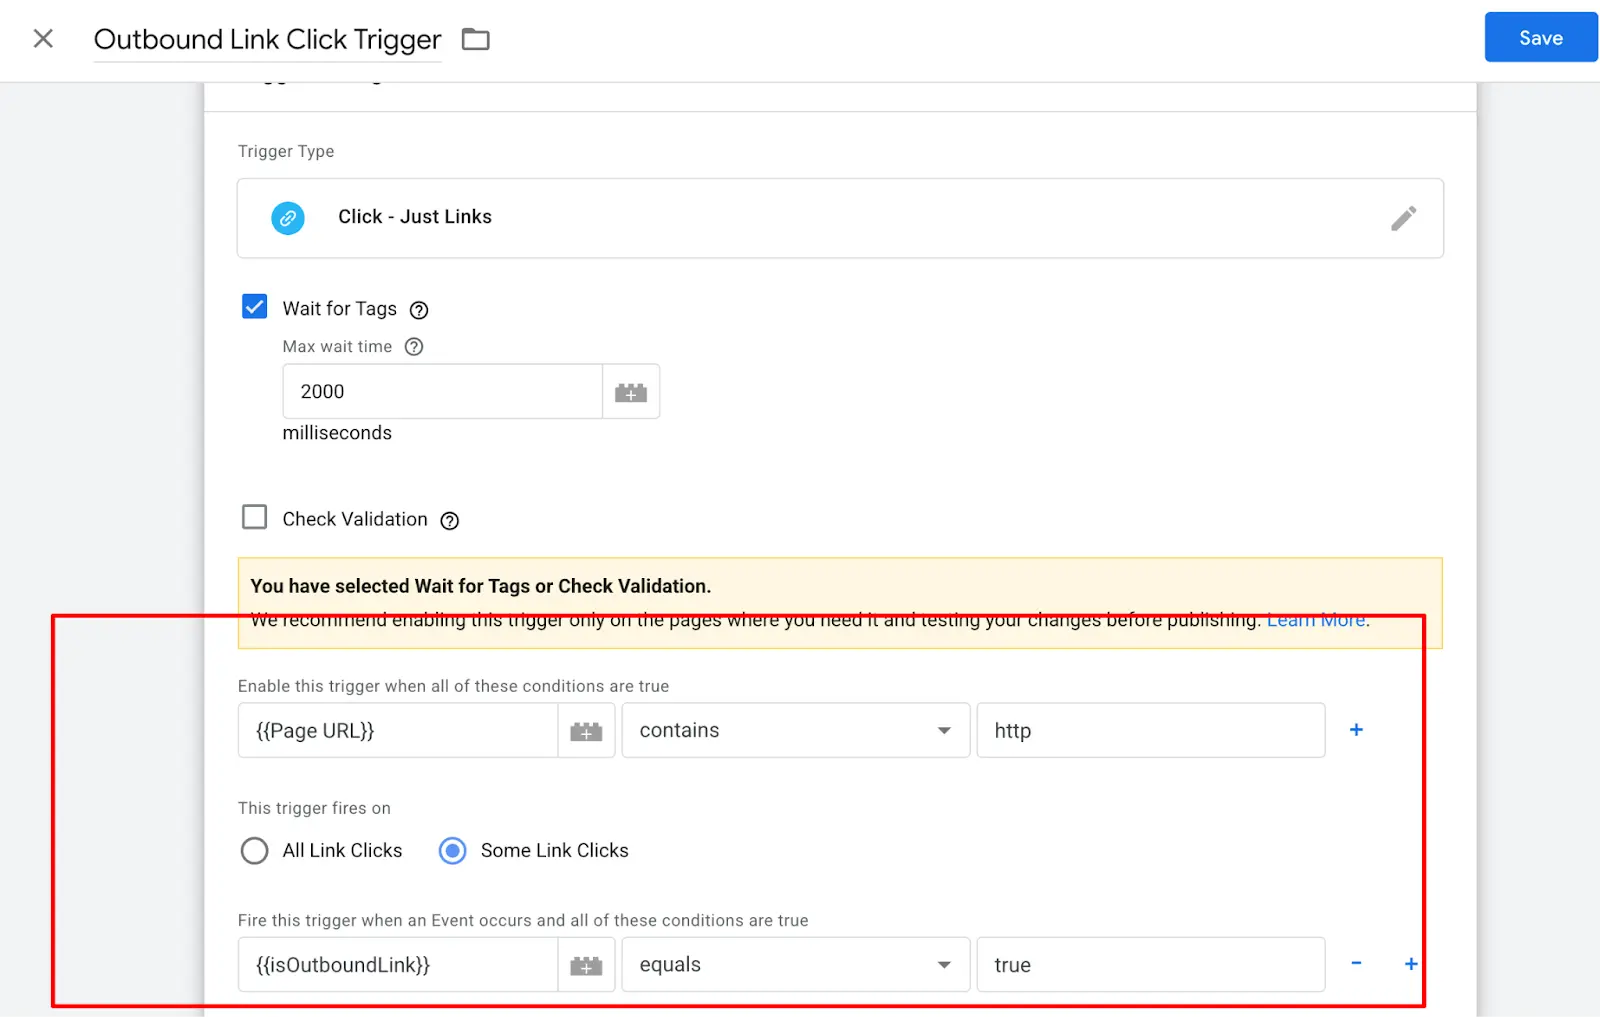
GTM Just Links trigger, “Some Link Clicks” selected, condition: isOutboundLink equals true, Wait for Tags enabled
Click Save.
Step 4: Create the GA4 Event Tag
Now we’ll create the tag that sends the outbound link click data to GA4 as a custom event.
1. Go to Tags → New
In the left sidebar, click Tags, then click New. Name it GA4 Event – Outbound Link Click.
2. Choose Tag Type: Google Analytics: GA4 Event
Click Tag Configuration and select Google Analytics → Google Analytics: GA4 Event.
GTM Tag Configuration, selecting “Google Analytics: GA4 Event” tag type
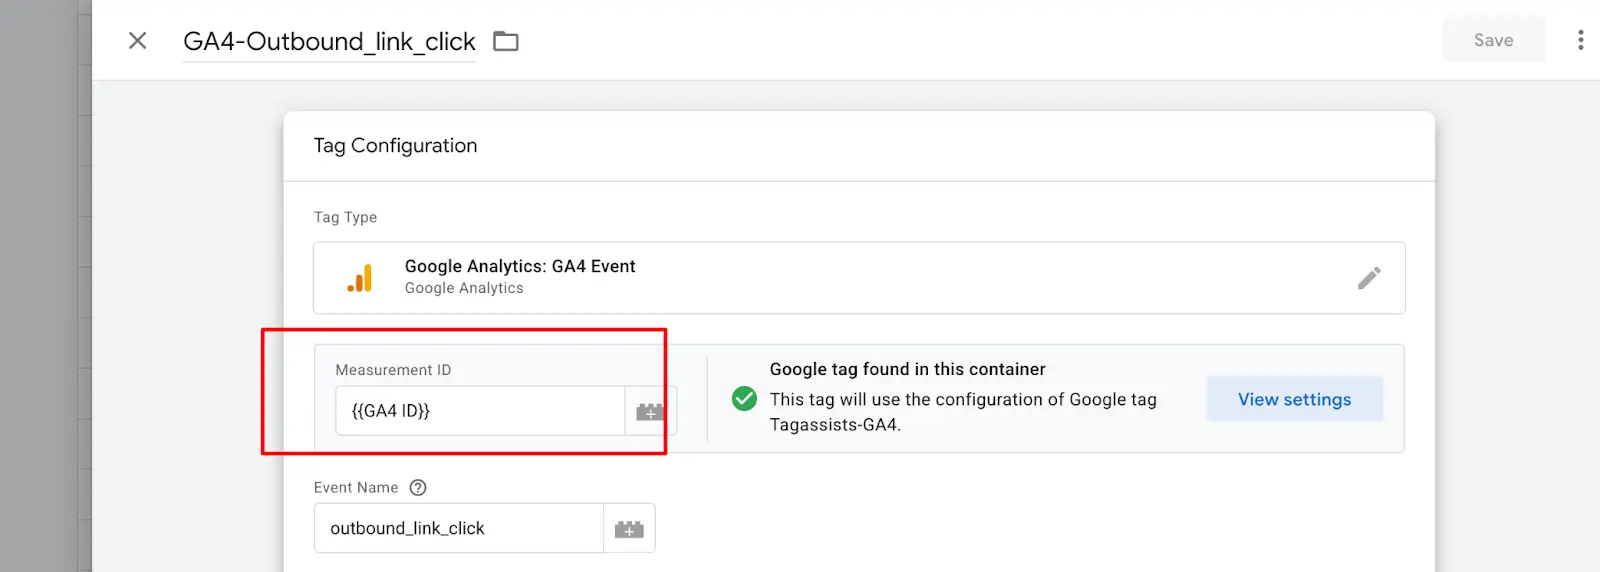
3. Fill in the Tag Details
Configure the tag as follows:
- Measurement ID: Select your GA4 Configuration Tag (e.g. {{GA4 Configuration}})
- Event Name: outbound_link_click
Then click Add Row under Event Parameters and add these parameters:
Parameter Name | Value |
link_url | {{Click URL}} |
link_text | {{Click Text}} |
link_domain | {{Click URL}} (or a custom domain variable) |
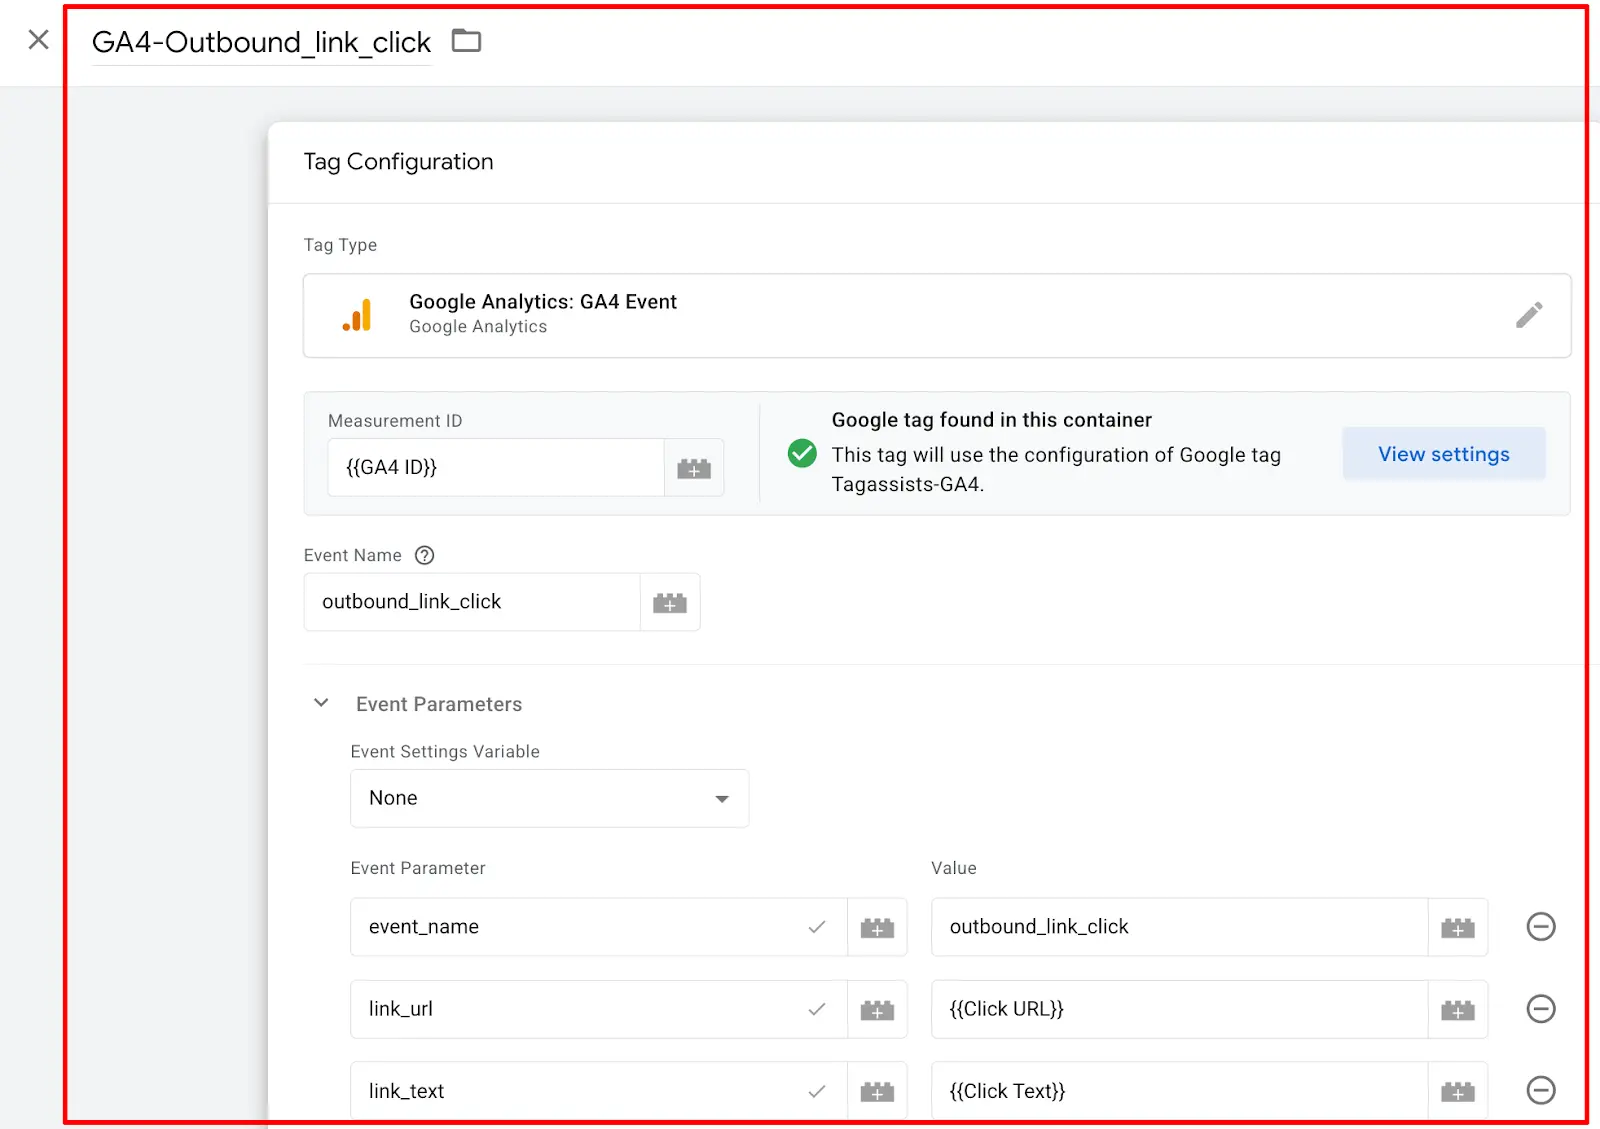
GTM GA4 Event tag configuration, event name “outbound_link_click” with link_url, link_text, link_domain event parameters added
4. Assign the Trigger
Scroll down to the Triggering section and select the trigger you created: Trigger – Outbound Link Click.
Click Save.
GTM tag, Triggering section showing “Trigger – Outbound Link Click” selected as the trigger
Step 5: Test in GTM Preview Mode
Before publishing, always test your setup using GTM’s built-in Preview / Debug mode.
1. Click "Preview" in GTM
In the top-right corner of GTM, click the Preview button. Enter your website URL and click Connect. A new tab with your site will open, and Tag Assistant will connect.
GTM Preview mode, entering the website URL in Tag Assistant to begin a debugging session
2. Click an Outbound Link on Your Site
On your website, find any external link and click it. Switch back to the GTM Preview tab and look in the left panel for a Link Click event.
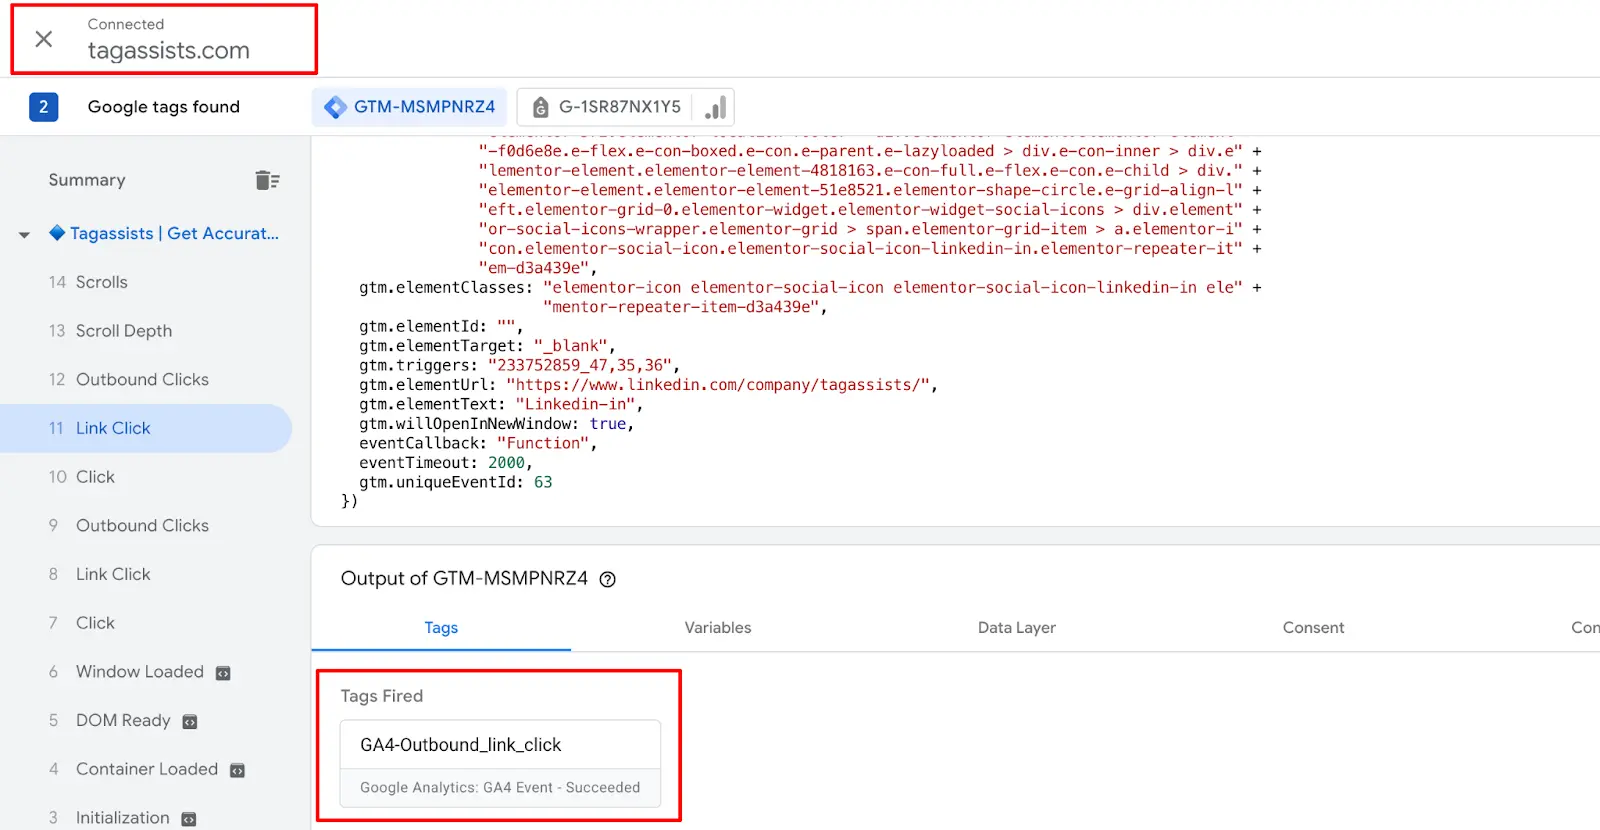
3. Check That Your Tag Fired
Click on the Link Click event in the left panel, then go to the Tags Fired section on the right. You should see your GA4 Event – Outbound Link Click tag listed there.
GTM Preview / Tag Assistant, Link Click event selected, showing “GA4 Event – Outbound Link Click” in the Tags Fired section
Tag fired? Great! You’re ready to publish! If not, double-check your trigger conditions and make sure the isOutboundLink variable returns true by checking the Variables tab in Preview mode.
Step 6: Publish Your GTM Container
Once testing looks good, it’s time to go live.
Click Submit in GTM
Back in the GTM workspace, click the Submit button in the top right. Add a version name like “Outbound Link Tracking – GA4” and a brief description. Click Publish.
GTM Submit / Publish screen, version name and description entered, ready to publish the container
Verify in GA4 DebugView
After publishing, verify that events are reaching GA4 by using the DebugView in real time.
1. Click Submit in GTM
Go to your GA4 property → Admin → DebugView (under Property). Make sure you have the GTM Preview session still open, or that debug mode is active on your browser.
2. Click an Outbound Link on Your Site
Click any external link on your website. Switch to GA4 DebugView, and within seconds, you should see the outbound_link_click event appear in the timeline.
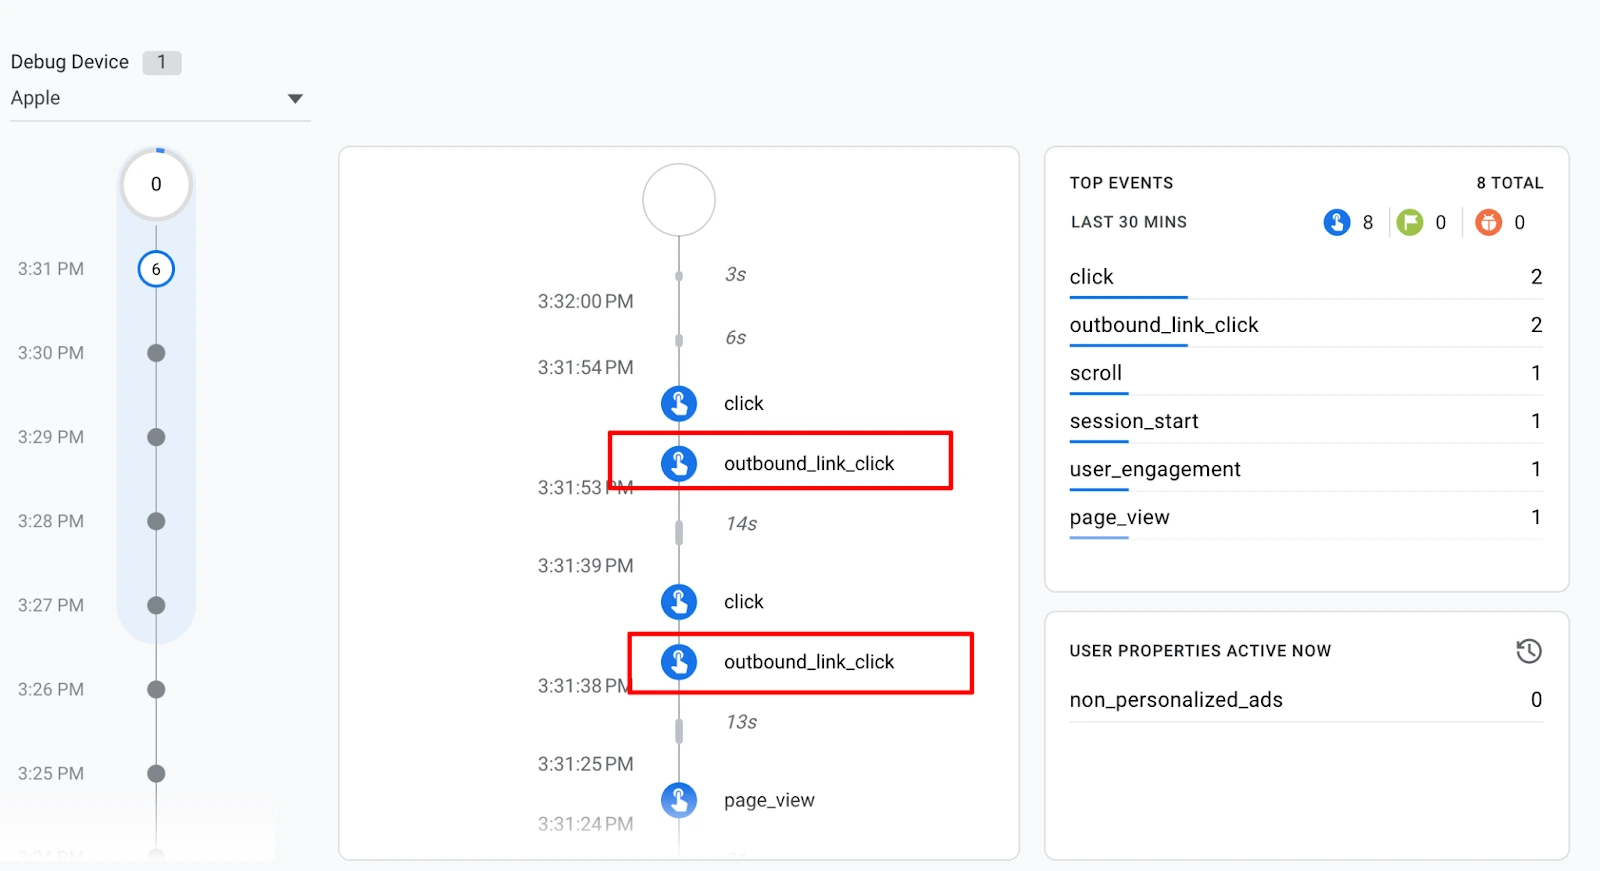
GA4 DebugView, showing “outbound_link_click” event appearing in the real-time event timeline
3. Inspect Event Parameters
Click on the outbound_link_click event in DebugView. You should see the parameters you configured: link_url, link_text, and link_domain with their correct values.
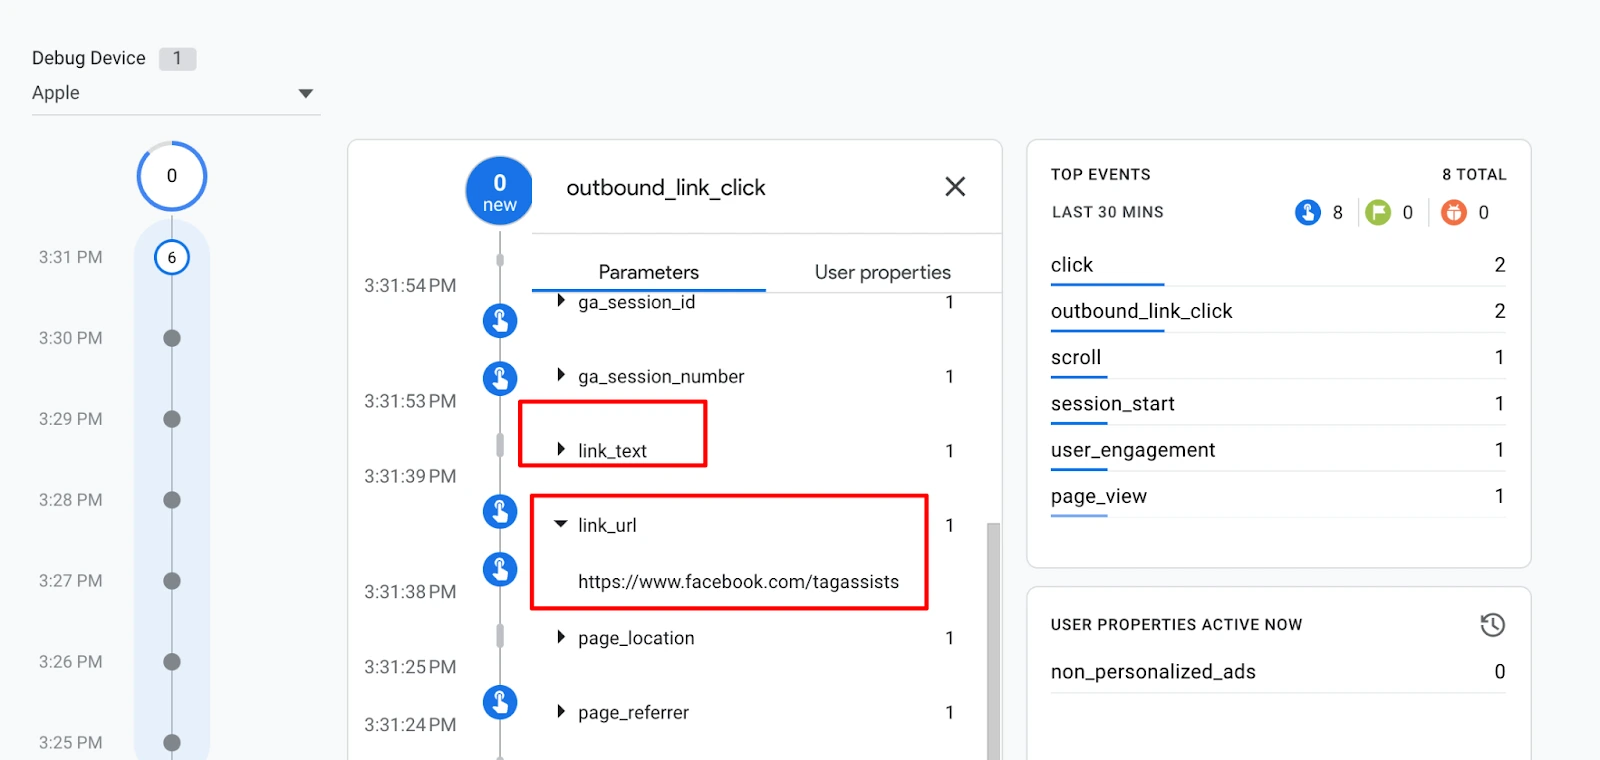
GA4 DebugView, outbound_link_click event expanded showing link_url, link_text, link_domain parameters with values
6. View Outbound Link Reports in GA4
After 24–48 hours of data collection, you can view your outbound link data in a few places.
Option A: Standard Events Report
Go to Reports → Engagement → Events. Look for the event named outbound_link_click (or click if using Enhanced Measurement). Click the event name to see top outbound URLs.
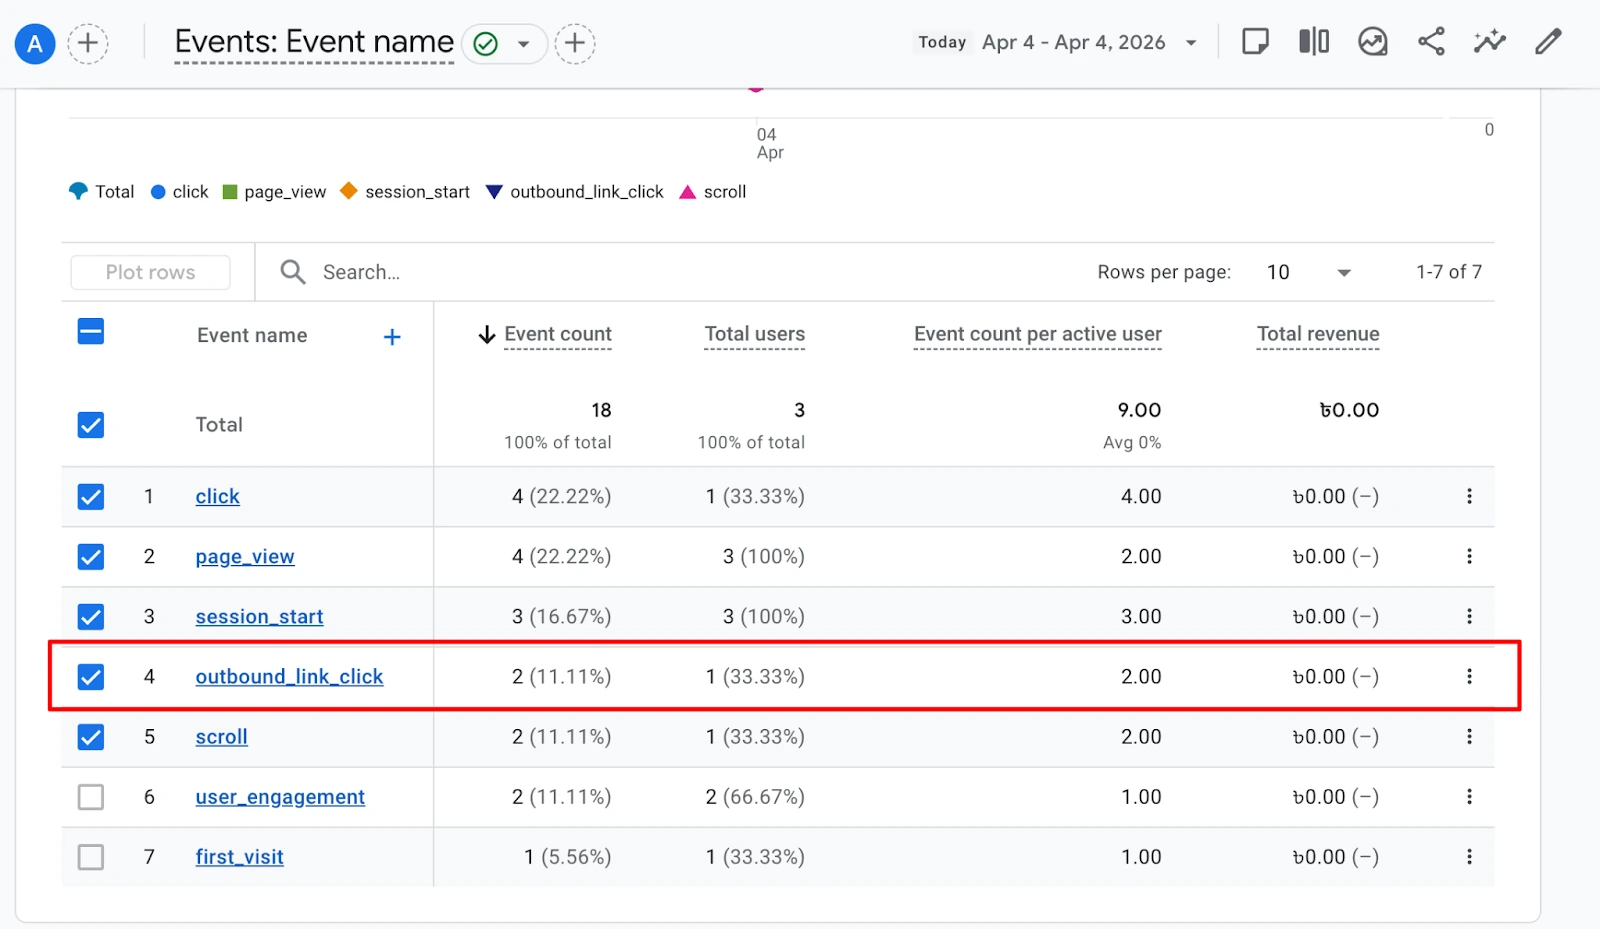
GA4 Reports → Engagement → Events — showing outbound_link_click event in the events list with event count
Option B: Explorations (Recommended for Detail)
For a more powerful report, use Explore → Free Form:
1. Create a New Exploration
Go to Explore in the left sidebar → click Blank to start a free-form report.
2. Add Dimensions and Metrics
Click the + icon next to Dimensions and add:
- Event name
- Link URL
- Page path and screen class (to see
- which page the click came from)
Click the + next to Metrics and add:
- Event count
- Total users
3. Drag to Rows and Values
Drag Link URL and Page path into Rows. Drag Event count and Total users into Values. Apply a segment or filter for event_name = outbound_link_click.
GA4 Explorations, Free Form report showing Link URL in rows with Event Count and Total Users metrics, filtered by outbound_link_click
Register Custom Dimensions (Important!)
By default, custom event parameters like link_url and link_text will not appear in GA4’s standard reports unless you register them as Custom Dimensions.
Don’t skip this step! Without registering custom dimensions, you won’t be able to use these parameters in standard reports or Looker Studio.
Go to Admin → Custom Definitions
In GA4, go to Admin → Property → Custom Definitions. Click Create Custom Dimension.
2Register Each Parameter
Create a custom dimension for each parameter you’re sending:
Dimension Name | Scope | Event Parameter |
Link URL | Event | link_url |
Link Text | Event | link_text |
Link Domain | Event | link_domain |
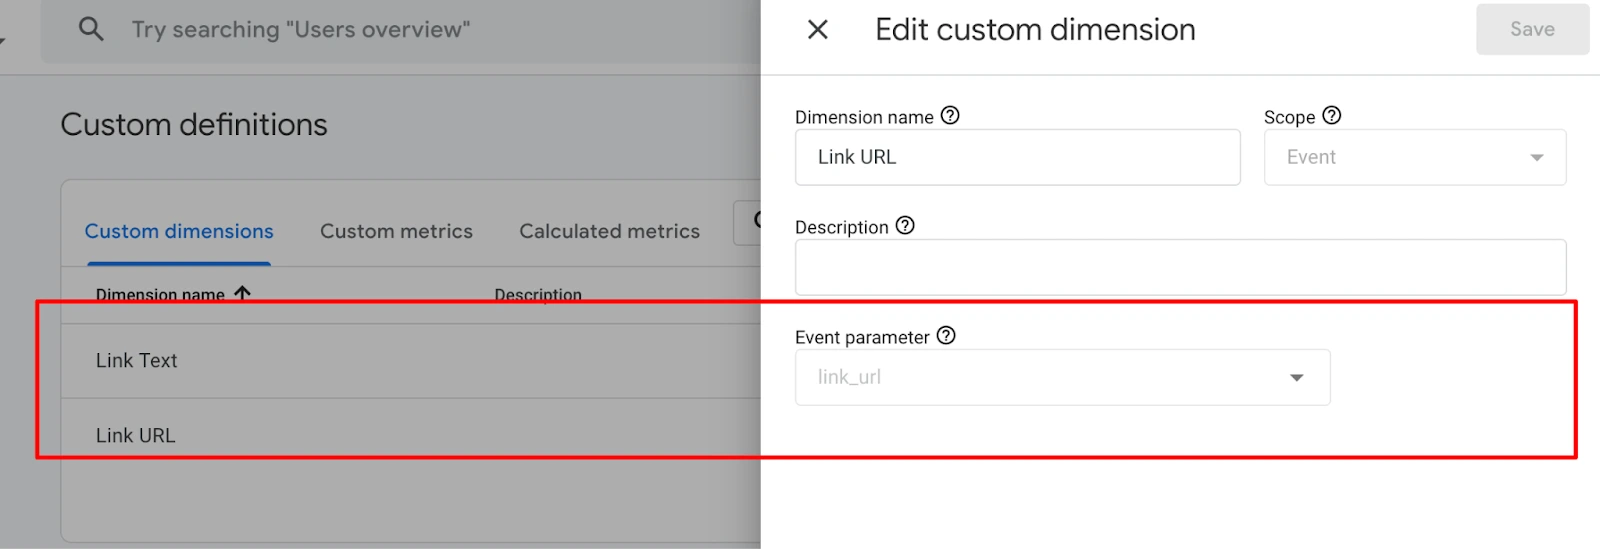
GA4 Admin → Custom Definitions, showing newly created custom dimensions for link_url, link_text, and link_domain
Need Help with GA4 or GTM Setup?
Need Help with GA4 or GTM Setup?
Fix tracking issues, improve data accuracy, and set up analytics the right way.
If setting up outbound link tracking feels confusing or time-consuming, you don’t have to do it alone. At Tagassists, we help businesses implement accurate GA4 and Google Tag Manager tracking, including advanced event tracking, conversion setup, and paid ads tracking.
Whether you need a quick setup or a fully customised tracking solution, our team can ensure your data is clean, reliable, and ready for better decision-making.
Summary
You can track outbound link clicks in GA4 in two ways: Enhanced Measurement or Google Tag Manager (GTM).
Enhanced Measurement is quick and easy to use with no setup, but it offers limited control. The GTM method takes more effort but gives you full control, better accuracy, and more customization options.
Here is a quick recap of everything we covered:
- Enhanced Measurement is the quickest way: just enable the Outbound Clicks toggle in GA4 Data Streams settings.
- GTM method gives you full control: create a Custom JavaScript Variable, a Just Links trigger, and a GA4 Event tag.
- Always test in GTM Preview mode and GA4 DebugView before publishing.
- Register custom dimensions in GA4 so your parameters show up in reports.
- Use GA4 Explorations for the most detailed outbound link reporting.
Tagassists
We track every click, visit, and conversion accurately using Google Tag Manager, GA4, Meta Pixel, and other ad platforms. At Tagassists, we help businesses set up proper tracking and analytics so they can clearly understand how their ads perform. Our goal is to turn marketing data into simple insights that help improve campaigns and maximize ROAS.